并发包
ConHashMap
并发集合
集合对比
三种集合:
- HashMap 是线程不安全的,性能好
- Hashtable 线程安全基于 synchronized,综合性能差,已经被淘汰
- ConcurrentHashMap 保证了线程安全,综合性能较好,不止线程安全,而且效率高,性能好
集合对比:
- Hashtable 继承 Dictionary 类,HashMap、ConcurrentHashMap 继承 AbstractMap,均实现 Map 接口
- Hashtable 底层是数组 + 链表,JDK8 以后 HashMap 和 ConcurrentHashMap 底层是数组 + 链表 + 红黑树
- HashMap 线程非安全,Hashtable 线程安全,Hashtable 的方法都加了 synchronized 关来确保线程同步
- ConcurrentHashMap、Hashtable 不允许 null 值,HashMap 允许 null 值
- ConcurrentHashMap、HashMap 的初始容量为 16,Hashtable 初始容量为11,填充因子默认都是 0.75,两种 Map 扩容是当前容量翻倍:capacity * 2,Hashtable 扩容时是容量翻倍 + 1:capacity*2 + 1

工作步骤:
初始化,使用 cas 来保证并发安全,懒惰初始化 table
树化,当 table.length < 64 时,先尝试扩容,超过 64 时,并且 bin.length > 8 时,会将链表树化,树化过程会用 synchronized 锁住链表头
说明:锁住某个槽位的对象头,是一种很好的细粒度的加锁方式,类似 MySQL 中的行锁
put,如果该 bin 尚未创建,只需要使用 cas 创建 bin;如果已经有了,锁住链表头进行后续 put 操作,元素添加至 bin 的尾部
get,无锁操作仅需要保证可见性,扩容过程中 get 操作拿到的是 ForwardingNode 会让 get 操作在新 table 进行搜索
扩容,扩容时以 bin 为单位进行,需要对 bin 进行 synchronized,但这时其它竞争线程也不是无事可做,它们会帮助把其它 bin 进行扩容
size,元素个数保存在 baseCount 中,并发时的个数变动保存在 CounterCell[] 当中,最后统计数量时累加
1 | //需求:多个线程同时往HashMap容器中存入数据会出现安全问题 |
并发死链
JDK1.7 的 HashMap 采用的头插法(拉链法)进行节点的添加,HashMap 的扩容长度为原来的 2 倍
resize() 中节点(Entry)转移的源代码:
1 | void transfer(Entry[] newTable, boolean rehash) { |
JDK 8 虽然将扩容算法做了调整,改用了尾插法,但仍不意味着能够在多线程环境下能够安全扩容,还会出现其它问题(如扩容丢数据)
B站视频解析:https://www.bilibili.com/video/BV1n541177Ea
成员属性
变量
存储数组:
1
transient volatile Node<K,V>[] table;
散列表的长度:
1
2private static final int MAXIMUM_CAPACITY = 1 << 30; // 最大长度
private static final int DEFAULT_CAPACITY = 16; // 默认长度并发级别,JDK7 遗留下来,1.8 中不代表并发级别:
1
private static final int DEFAULT_CONCURRENCY_LEVEL = 16;
负载因子,JDK1.8 的 ConcurrentHashMap 中是固定值:
1
private static final float LOAD_FACTOR = 0.75f;
阈值:
1
2
3static final int TREEIFY_THRESHOLD = 8; // 链表树化的阈值
static final int UNTREEIFY_THRESHOLD = 6; // 红黑树转化为链表的阈值
static final int MIN_TREEIFY_CAPACITY = 64; // 当数组长度达到64且某个桶位中的链表长度超过8,才会真正树化扩容相关:
1
2
3
4private static final int MIN_TRANSFER_STRIDE = 16; // 线程迁移数据【最小步长】,控制线程迁移任务的最小区间
private static int RESIZE_STAMP_BITS = 16; // 用来计算扩容时生成的【标识戳】
private static final int MAX_RESIZERS = (1 << (32 - RESIZE_STAMP_BITS)) - 1;// 65535-1并发扩容最多线程数
private static final int RESIZE_STAMP_SHIFT = 32 - RESIZE_STAMP_BITS; // 扩容时使用节点哈希值:
1
2
3
4static final int MOVED = -1; // 表示当前节点是 FWD 节点
static final int TREEBIN = -2; // 表示当前节点已经树化,且当前节点为 TreeBin 对象
static final int RESERVED = -3; // 表示节点时临时节点
static final int HASH_BITS = 0x7fffffff; // 正常节点的哈希值的可用的位数扩容过程:volatile 修饰保证多线程的可见性
1
2
3
4// 扩容过程中,会将扩容中的新 table 赋值给 nextTable 保持引用,扩容结束之后,这里会被设置为 null
private transient volatile Node<K,V>[] nextTable;
// 记录扩容进度,所有线程都要从 0 - transferIndex 中分配区间任务,简单说就是老表转移到哪了,索引从高到低转移
private transient volatile int transferIndex;累加统计:
1
2
3
4
5
6// LongAdder 中的 baseCount 未发生竞争时或者当前LongAdder处于加锁状态时,增量累到到 baseCount 中
private transient volatile long baseCount;
// LongAdder 中的 cellsBuzy,0 表示当前 LongAdder 对象无锁状态,1 表示当前 LongAdder 对象加锁状态
private transient volatile int cellsBusy;
// LongAdder 中的 cells 数组,
private transient volatile CounterCell[] counterCells;控制变量:
sizeCtl < 0:
-1 表示当前 table 正在初始化(有线程在创建 table 数组),当前线程需要自旋等待
其他负数表示当前 map 的 table 数组正在进行扩容,高 16 位表示扩容的标识戳;低 16 位表示 (1 + nThread) 当前参与并发扩容的线程数量 + 1
sizeCtl = 0,表示创建 table 数组时使用 DEFAULT_CAPACITY 为数组大小
sizeCtl > 0:
- 如果 table 未初始化,表示初始化大小
- 如果 table 已经初始化,表示下次扩容时的触发条件(阈值,元素个数,不是数组的长度)
1
private transient volatile int sizeCtl; // volatile 保持可见性
内部类
Node 节点:
1
2
3
4
5
6
7
8static class Node<K,V> implements Entry<K,V> {
// 节点哈希值
final int hash;
final K key;
volatile V val;
// 单向链表
volatile Node<K,V> next;
}TreeBin 节点:
1
2
3
4
5
6
7
8
9
10
11
12
13
14
15
16static final class TreeBin<K,V> extends Node<K,V> {
// 红黑树根节点
TreeNode<K,V> root;
// 链表的头节点
volatile TreeNode<K,V> first;
// 等待者线程
volatile Thread waiter;
volatile int lockState;
// 写锁状态 写锁是独占状态,以散列表来看,真正进入到 TreeBin 中的写线程同一时刻只有一个线程
static final int WRITER = 1;
// 等待者状态(写线程在等待),当 TreeBin 中有读线程目前正在读取数据时,写线程无法修改数据
static final int WAITER = 2;
// 读锁状态是共享,同一时刻可以有多个线程 同时进入到 TreeBi 对象中获取数据,每一个线程都给 lockState + 4
static final int READER = 4;
}TreeNode 节点:
1
2
3
4
5
6
7static final class TreeNode<K,V> extends Node<K,V> {
TreeNode<K,V> parent; // red-black tree links
TreeNode<K,V> left;
TreeNode<K,V> right;
TreeNode<K,V> prev; //双向链表
boolean red;
}ForwardingNode 节点:转移节点
1
2
3
4
5
6
7
8
9static final class ForwardingNode<K,V> extends Node<K,V> {
// 持有扩容后新的哈希表的引用
final Node<K,V>[] nextTable;
ForwardingNode(Node<K,V>[] tab) {
// ForwardingNode 节点的 hash 值设为 -1
super(MOVED, null, null, null);
this.nextTable = tab;
}
}
代码块
变量:
1
2
3
4
5
6
7
8
9
10
11
12
13
14// 表示sizeCtl属性在 ConcurrentHashMap 中内存偏移地址
private static final long SIZECTL;
// 表示transferIndex属性在 ConcurrentHashMap 中内存偏移地址
private static final long TRANSFERINDEX;
// 表示baseCount属性在 ConcurrentHashMap 中内存偏移地址
private static final long BASECOUNT;
// 表示cellsBusy属性在 ConcurrentHashMap 中内存偏移地址
private static final long CELLSBUSY;
// 表示cellValue属性在 CounterCell 中内存偏移地址
private static final long CELLVALUE;
// 表示数组第一个元素的偏移地址
private static final long ABASE;
// 用位移运算替代乘法
private static final int ASHIFT;赋值方法:
1
2
3
4
5
6
7
8
9
10
11
12
13// 表示数组单元所占用空间大小,scale 表示 Node[] 数组中每一个单元所占用空间大小,int 是 4 字节
int scale = U.arrayIndexScale(ak);
// 判断一个数是不是 2 的 n 次幂,比如 8:1000 & 0111 = 0000
if ((scale & (scale - 1)) != 0)
throw new Error("data type scale not a power of two");
// numberOfLeadingZeros(n):返回当前数值转换为二进制后,从高位到低位开始统计,看有多少个0连续在一起
// 8 → 1000 numberOfLeadingZeros(8) = 28
// 4 → 100 numberOfLeadingZeros(4) = 29 int 值就是占4个字节
ASHIFT = 31 - Integer.numberOfLeadingZeros(scale);
// ASHIFT = 31 - 29 = 2 ,int 的大小就是 2 的 2 次方,获取次方数
// ABASE + (5 << ASHIFT) 用位移运算替代了乘法,获取 arr[5] 的值
构造方法
无参构造, 散列表结构延迟初始化,默认的数组大小是 16:
1
2public ConcurrentHashMap() {
}有参构造:
1
2
3
4
5
6
7
8
9
10
11public ConcurrentHashMap(int initialCapacity) {
// 指定容量初始化
if (initialCapacity < 0) throw new IllegalArgumentException();
int cap = ((initialCapacity >= (MAXIMUM_CAPACITY >>> 1)) ?
MAXIMUM_CAPACITY :
// 假如传入的参数是 16,16 + 8 + 1 ,最后得到 32
// 传入 12, 12 + 6 + 1 = 19,最后得到 32,尽可能的大,与 HashMap不一样
tableSizeFor(initialCapacity + (initialCapacity >>> 1) + 1));
// sizeCtl > 0,当目前 table 未初始化时,sizeCtl 表示初始化容量
this.sizeCtl = cap;
}1
2
3
4
5
6
7
8
9private static final int tableSizeFor(int c) {
int n = c - 1;
n |= n >>> 1;
n |= n >>> 2;
n |= n >>> 4;
n |= n >>> 8;
n |= n >>> 16;
return (n < 0) ? 1 : (n >= MAXIMUM_CAPACITY) ? MAXIMUM_CAPACITY : n + 1;
}HashMap 部分详解了该函数,核心思想就是把最高位是 1 的位以及右边的位全部置 1,结果加 1 后就是 2 的 n 次幂
多个参数构造方法:
1
2
3
4
5
6
7
8
9
10
11
12
13
14public ConcurrentHashMap(int initialCapacity, float loadFactor, int concurrencyLevel) {
if (!(loadFactor > 0.0f) || initialCapacity < 0 || concurrencyLevel <= 0)
throw new IllegalArgumentException();
// 初始容量小于并发级别
if (initialCapacity < concurrencyLevel)
// 把并发级别赋值给初始容量
initialCapacity = concurrencyLevel;
// loadFactor 默认是 0.75
long size = (long)(1.0 + (long)initialCapacity / loadFactor);
int cap = (size >= (long)MAXIMUM_CAPACITY) ?
MAXIMUM_CAPACITY : tableSizeFor((int)size);
// sizeCtl > 0,当目前 table 未初始化时,sizeCtl 表示初始化容量
this.sizeCtl = cap;
}集合构造方法:
1
2
3
4
5
6
7
8
9
10public ConcurrentHashMap(Map<? extends K, ? extends V> m) {
this.sizeCtl = DEFAULT_CAPACITY; // 默认16
putAll(m);
}
public void putAll(Map<? extends K, ? extends V> m) {
// 尝试触发扩容
tryPresize(m.size());
for (Entry<? extends K, ? extends V> e : m.entrySet())
putVal(e.getKey(), e.getValue(), false);
}1
2
3
4
5
6
7
8
9
10
11
12
13
14
15
16
17
18
19
20
21
22
23
24
25
26
27
28
29
30
31private final void tryPresize(int size) {
// 扩容为大于 2 倍的最小的 2 的 n 次幂
int c = (size >= (MAXIMUM_CAPACITY >>> 1)) ? MAXIMUM_CAPACITY :
tableSizeFor(size + (size >>> 1) + 1);
int sc;
while ((sc = sizeCtl) >= 0) {
Node<K,V>[] tab = table; int n;
// 数组还未初始化,【一般是调用集合构造方法才会成立,put 后调用该方法都是不成立的】
if (tab == null || (n = tab.length) == 0) {
n = (sc > c) ? sc : c;
if (U.compareAndSwapInt(this, SIZECTL, sc, -1)) {
try {
if (table == tab) {
Node<K,V>[] nt = (Node<K,V>[])new Node<?,?>[n];
table = nt;
sc = n - (n >>> 2);// 扩容阈值:n - 1/4 n
}
} finally {
sizeCtl = sc; // 扩容阈值赋值给sizeCtl
}
}
}
// 未达到扩容阈值或者数组长度已经大于最大长度
else if (c <= sc || n >= MAXIMUM_CAPACITY)
break;
// 与 addCount 逻辑相同
else if (tab == table) {
}
}
}
成员方法
数据访存
tabAt():获取数组某个槽位的头节点,类似于数组中的直接寻址 arr[i]
1
2
3
4
5// i 是数组索引
static final <K,V> Node<K,V> tabAt(Node<K,V>[] tab, int i) {
// (i << ASHIFT) + ABASE == ABASE + i * 4 (一个 int 占 4 个字节),这就相当于寻址,替代了乘法
return (Node<K,V>)U.getObjectVolatile(tab, ((long)i << ASHIFT) + ABASE);
}casTabAt():指定数组索引位置修改原值为指定的值
1
2
3static final <K,V> boolean casTabAt(Node<K,V>[] tab, int i, Node<K,V> c, Node<K,V> v) {
return U.compareAndSwapObject(tab, ((long)i << ASHIFT) + ABASE, c, v);
}setTabAt():指定数组索引位置设置值
1
2
3static final <K,V> void setTabAt(Node<K,V>[] tab, int i, Node<K,V> v) {
U.putObjectVolatile(tab, ((long)i << ASHIFT) + ABASE, v);
}
添加方法
1 | public V put(K key, V value) { |
putVal()
1
2
3
4
5
6
7
8
9
10
11
12
13
14
15
16
17
18
19
20
21
22
23
24
25
26
27
28
29
30
31
32
33
34
35
36
37
38
39
40
41
42
43
44
45
46
47
48
49
50
51
52
53
54
55
56
57
58
59
60
61
62
63
64
65
66
67
68
69
70
71
72
73
74
75
76
77
78
79
80
81
82
83
84
85
86
87
88
89
90
91
92
93
94
95
96
97
98
99
100final V putVal(K key, V value, boolean onlyIfAbsent) {
// 【ConcurrentHashMap 不能存放 null 值】
if (key == null || value == null) throw new NullPointerException();
// 扰动运算,高低位都参与寻址运算
int hash = spread(key.hashCode());
// 表示当前 k-v 封装成 node 后插入到指定桶位后,在桶位中的所属链表的下标位置
int binCount = 0;
// tab 引用当前 map 的数组 table,开始自旋
for (Node<K,V>[] tab = table;;) {
// f 表示桶位的头节点,n 表示哈希表数组的长度
// i 表示 key 通过寻址计算后得到的桶位下标,fh 表示桶位头结点的 hash 值
Node<K,V> f; int n, i, fh;
// 【CASE1】:表示当前 map 中的 table 尚未初始化
if (tab == null || (n = tab.length) == 0)
//【延迟初始化】
tab = initTable();
// 【CASE2】:i 表示 key 使用【寻址算法】得到 key 对应数组的下标位置,tabAt 获取指定桶位的头结点f
else if ((f = tabAt(tab, i = (n - 1) & hash)) == null) {
// 对应的数组为 null 说明没有哈希冲突,直接新建节点添加到表中
if (casTabAt(tab, i, null, new Node<K,V>(hash, key, value, null)))
break;
}
// 【CASE3】:逻辑说明数组已经被初始化,并且当前 key 对应的位置不为 null
// 条件成立表示当前桶位的头结点为 FWD 结点,表示目前 map 正处于扩容过程中
else if ((fh = f.hash) == MOVED)
// 当前线程【需要去帮助哈希表完成扩容】
tab = helpTransfer(tab, f);
// 【CASE4】:哈希表没有在扩容,当前桶位可能是链表也可能是红黑树
else {
// 当插入 key 存在时,会将旧值赋值给 oldVal 返回
V oldVal = null;
// 【锁住当前 key 寻址的桶位的头节点】
synchronized (f) {
// 这里重新获取一下桶的头节点有没有被修改,因为可能被其他线程修改过,这里是线程安全的获取
if (tabAt(tab, i) == f) {
// 【头节点的哈希值大于 0 说明当前桶位是普通的链表节点】
if (fh >= 0) {
// 当前的插入操作没出现重复的 key,追加到链表的末尾,binCount表示链表长度 -1
// 插入的key与链表中的某个元素的 key 一致,变成替换操作,binCount 表示第几个节点冲突
binCount = 1;
// 迭代循环当前桶位的链表,e 是每次循环处理节点,e 初始是头节点
for (Node<K,V> e = f;; ++binCount) {
// 当前循环节点 key
K ek;
// key 的哈希值与当前节点的哈希一致,并且 key 的值也相同
if (e.hash == hash &&
((ek = e.key) == key ||
(ek != null && key.equals(ek)))) {
// 把当前节点的 value 赋值给 oldVal
oldVal = e.val;
// 允许覆盖
if (!onlyIfAbsent)
// 新数据覆盖旧数据
e.val = value;
// 跳出循环
break;
}
Node<K,V> pred = e;
// 如果下一个节点为空,把数据封装成节点插入链表尾部,【binCount 代表长度 - 1】
if ((e = e.next) == null) {
pred.next = new Node<K,V>(hash, key,
value, null);
break;
}
}
}
// 当前桶位头节点是红黑树
else if (f instanceof TreeBin) {
Node<K,V> p;
binCount = 2;
if ((p = ((TreeBin<K,V>)f).putTreeVal(hash, key,
value)) != null) {
oldVal = p.val;
if (!onlyIfAbsent)
p.val = value;
}
}
}
}
// 条件成立说明当前是链表或者红黑树
if (binCount != 0) {
// 如果 binCount >= 8 表示处理的桶位一定是链表,说明长度是 9
if (binCount >= TREEIFY_THRESHOLD)
// 树化
treeifyBin(tab, i);
if (oldVal != null)
return oldVal;
break;
}
}
}
// 统计当前 table 一共有多少数据,判断是否达到扩容阈值标准,触发扩容
// binCount = 0 表示当前桶位为 null,node 可以直接放入,2 表示当前桶位已经是红黑树
addCount(1L, binCount);
return null;
}spread():扰动函数
将 hashCode 无符号右移 16 位,高 16bit 和低 16bit 做异或,最后与 HASH_BITS 相与变成正数,与树化节点和转移节点区分,把高低位都利用起来减少哈希冲突,保证散列的均匀性
1
2
3static final int spread(int h) {
return (h ^ (h >>> 16)) & HASH_BITS; // 0111 1111 1111 1111 1111 1111 1111 1111
}initTable():初始化数组,延迟初始化
1
2
3
4
5
6
7
8
9
10
11
12
13
14
15
16
17
18
19
20
21
22
23
24
25
26
27
28
29
30
31private final Node<K,V>[] initTable() {
// tab 引用 map.table,sc 引用 sizeCtl
Node<K,V>[] tab; int sc;
// table 尚未初始化,开始自旋
while ((tab = table) == null || tab.length == 0) {
// sc < 0 说明 table 正在初始化或者正在扩容,当前线程可以释放 CPU 资源
if ((sc = sizeCtl) < 0)
Thread.yield();
// sizeCtl 设置为 -1,相当于加锁,【设置的是 SIZECTL 位置的数据】,
// 因为是 sizeCtl 是基本类型,不是引用类型,所以 sc 保存的是数据的副本
else if (U.compareAndSwapInt(this, SIZECTL, sc, -1)) {
try {
// 线程安全的逻辑,再进行一次判断
if ((tab = table) == null || tab.length == 0) {
// sc > 0 创建 table 时使用 sc 为指定大小,否则使用 16 默认值
int n = (sc > 0) ? sc : DEFAULT_CAPACITY;
// 创建哈希表数组
Node<K,V>[] nt = (Node<K,V>[])new Node<?,?>[n];
table = tab = nt;
// 扩容阈值,n >>> 2 => 等于 1/4 n ,n - (1/4)n = 3/4 n => 0.75 * n
sc = n - (n >>> 2);
}
} finally {
// 解锁,把下一次扩容的阈值赋值给 sizeCtl
sizeCtl = sc;
}
break;
}
}
return tab;
}treeifyBin():树化方法
1
2
3
4
5
6
7
8
9
10
11
12
13
14
15
16
17
18
19
20
21
22
23
24
25
26
27
28
29private final void treeifyBin(Node<K,V>[] tab, int index) {
Node<K,V> b; int n, sc;
if (tab != null) {
// 条件成立:【说明当前 table 数组长度未达到 64,此时不进行树化操作,进行扩容操作】
if ((n = tab.length) < MIN_TREEIFY_CAPACITY)
// 当前容量的 2 倍
tryPresize(n << 1);
// 条件成立:说明当前桶位有数据,且是普通 node 数据。
else if ((b = tabAt(tab, index)) != null && b.hash >= 0) {
// 【树化加锁】
synchronized (b) {
// 条件成立:表示加锁没问题。
if (tabAt(tab, index) == b) {
TreeNode<K,V> hd = null, tl = null;
for (Node<K,V> e = b; e != null; e = e.next) {
TreeNode<K,V> p = new TreeNode<K,V>(e.hash, e.key, e.val,null, null);
if ((p.prev = tl) == null)
hd = p;
else
tl.next = p;
tl = p;
}
setTabAt(tab, index, new TreeBin<K,V>(hd));
}
}
}
}
}addCount():添加计数,代表哈希表中的数据总量
1
2
3
4
5
6
7
8
9
10
11
12
13
14
15
16
17
18
19
20
21
22
23
24
25
26
27
28
29
30
31
32
33
34
35
36
37
38
39
40
41
42
43
44
45
46
47
48
49
50
51
52
53
54
55
56
57
58
59
60
61
62
63
64
65
66private final void addCount(long x, int check) {
// 【上面这部分的逻辑就是 LongAdder 的累加逻辑】
CounterCell[] as; long b, s;
// 判断累加数组 cells 是否初始化,没有就去累加 base 域,累加失败进入条件内逻辑
if ((as = counterCells) != null ||
!U.compareAndSwapLong(this, BASECOUNT, b = baseCount, s = b + x)) {
CounterCell a; long v; int m;
// true 未竞争,false 发生竞争
boolean uncontended = true;
// 判断 cells 是否被其他线程初始化
if (as == null || (m = as.length - 1) < 0 ||
// 前面的条件为 fasle 说明 cells 被其他线程初始化,通过 hash 寻址对应的槽位
(a = as[ThreadLocalRandom.getProbe() & m]) == null ||
// 尝试去对应的槽位累加,累加失败进入 fullAddCount 进行重试或者扩容
!(uncontended = U.compareAndSwapLong(a, CELLVALUE, v = a.value, v + x))) {
// 与 Striped64#longAccumulate 方法相同
fullAddCount(x, uncontended);
return;
}
// 表示当前桶位是 null,或者一个链表节点
if (check <= 1)
return;
// 【获取当前散列表元素个数】,这是一个期望值
s = sumCount();
}
// 表示一定 【是一个 put 操作调用的 addCount】
if (check >= 0) {
Node<K,V>[] tab, nt; int n, sc;
// 条件一:true 说明当前 sizeCtl 可能为一个负数表示正在扩容中,或者 sizeCtl 是一个正数,表示扩容阈值
// false 表示哈希表的数据的数量没达到扩容条件
// 然后判断当前 table 数组是否初始化了,当前 table 长度是否小于最大值限制,就可以进行扩容
while (s >= (long)(sc = sizeCtl) && (tab = table) != null &&
(n = tab.length) < MAXIMUM_CAPACITY) {
// 16 -> 32 扩容 标识为:1000 0000 0001 1011,【负数,扩容批次唯一标识戳】
int rs = resizeStamp(n);
// 表示当前 table,【正在扩容】,sc 高 16 位是扩容标识戳,低 16 位是线程数 + 1
if (sc < 0) {
// 条件一:判断扩容标识戳是否一样,fasle 代表一样
// 勘误两个条件:
// 条件二是:sc == (rs << 16 ) + 1,true 代表扩容完成,因为低16位是1代表没有线程扩容了
// 条件三是:sc == (rs << 16) + MAX_RESIZERS,判断是否已经超过最大允许的并发扩容线程数
// 条件四:判断新表的引用是否是 null,代表扩容完成
// 条件五:【扩容是从高位到低位转移】,transferIndex < 0 说明没有区间需要扩容了
if ((sc >>> RESIZE_STAMP_SHIFT) != rs || sc == rs + 1 ||
sc == rs + MAX_RESIZERS || (nt = nextTable) == null ||
transferIndex <= 0)
break;
// 设置当前线程参与到扩容任务中,将 sc 低 16 位值加 1,表示多一个线程参与扩容
// 设置失败其他线程或者 transfer 内部修改了 sizeCtl 值
if (U.compareAndSwapInt(this, SIZECTL, sc, sc + 1))
//【协助扩容线程】,持有nextTable参数
transfer(tab, nt);
}
// 逻辑到这说明当前线程是触发扩容的第一个线程,线程数量 + 2
// 1000 0000 0001 1011 0000 0000 0000 0000 +2 => 1000 0000 0001 1011 0000 0000 0000 0010
else if (U.compareAndSwapInt(this, SIZECTL, sc,(rs << RESIZE_STAMP_SHIFT) + 2))
//【触发扩容条件的线程】,不持有 nextTable,初始线程会新建 nextTable
transfer(tab, null);
s = sumCount();
}
}
}resizeStamp():扩容标识符,每次扩容都会产生一个,不是每个线程都产生,16 扩容到 32 产生一个,32 扩容到 64 产生一个
1
2
3
4
5
6
7
8
9
10
11
12
13
14
15/**
* 扩容的标识符
* 16 -> 32 从16扩容到32
* numberOfLeadingZeros(16) => 1 0000 => 32 - 5 = 27 => 0000 0000 0001 1011
* (1 << (RESIZE_STAMP_BITS - 1)) => 1000 0000 0000 0000 => 32768
* ---------------------------------------------------------------
* 0000 0000 0001 1011
* 1000 0000 0000 0000
* 1000 0000 0001 1011
* 永远是负数
*/
static final int resizeStamp(int n) {
// 或运算
return Integer.numberOfLeadingZeros(n) | (1 << (RESIZE_STAMP_BITS - 1)); // (16 -1 = 15)
}
扩容方法
扩容机制:
- 当链表中元素个数超过 8 个,数组的大小还未超过 64 时,此时进行数组的扩容,如果超过则将链表转化成红黑树
- put 数据后调用 addCount() 方法,判断当前哈希表的容量超过阈值 sizeCtl,超过进行扩容
- 增删改线程发现其他线程正在扩容,帮其扩容
常见方法:
transfer():数据转移到新表中,完成扩容
1
2
3
4
5
6
7
8
9
10
11
12
13
14
15
16
17
18
19
20
21
22
23
24
25
26
27
28
29
30
31
32
33
34
35
36
37
38
39
40
41
42
43
44
45
46
47
48
49
50
51
52
53
54
55
56
57
58
59
60
61
62
63
64
65
66
67
68
69
70
71
72
73
74
75
76
77
78
79
80
81
82
83
84
85
86
87
88
89
90
91
92
93
94
95
96
97
98
99
100
101
102
103
104
105
106
107
108
109
110
111
112
113
114
115
116
117
118
119
120
121
122
123
124
125
126
127
128
129
130
131
132
133
134
135
136
137
138
139
140
141
142
143
144
145
146
147
148
149
150
151
152
153
154
155
156
157
158
159
160
161
162
163
164
165
166
167
168
169
170
171
172
173
174
175
176
177
178
179
180
181
182
183
184
185
186
187
188
189
190
191private final void transfer(Node<K,V>[] tab, Node<K,V>[] nextTab) {
// n 表示扩容之前 table 数组的长度
int n = tab.length, stride;
// stride 表示分配给线程任务的步长,默认就是 16
if ((stride = (NCPU > 1) ? (n >>> 3) / NCPU : n) < MIN_TRANSFER_STRIDE)
stride = MIN_TRANSFER_STRIDE;
// 如果当前线程为触发本次扩容的线程,需要做一些扩容准备工作,【协助线程不做这一步】
if (nextTab == null) {
try {
// 创建一个容量是之前【二倍的 table 数组】
Node<K,V>[] nt = (Node<K,V>[])new Node<?,?>[n << 1];
nextTab = nt;
} catch (Throwable ex) {
sizeCtl = Integer.MAX_VALUE;
return;
}
// 把新表赋值给对象属性 nextTable,方便其他线程获取新表
nextTable = nextTab;
// 记录迁移数据整体位置的一个标记,transferIndex 计数从1开始不是 0,所以这里是长度,不是长度-1
transferIndex = n;
}
// 新数组的长度
int nextn = nextTab.length;
// 当某个桶位数据处理完毕后,将此桶位设置为 fwd 节点,其它写线程或读线程看到后,可以从中获取到新表
ForwardingNode<K,V> fwd = new ForwardingNode<K,V>(nextTab);
// 推进标记
boolean advance = true;
// 完成标记
boolean finishing = false;
// i 表示分配给当前线程任务,执行到的桶位
// bound 表示分配给当前线程任务的下界限制,因为是倒序迁移,16 迁移完 迁移 15,15完成去迁移14
for (int i = 0, bound = 0;;) {
Node<K,V> f; int fh;
// 给当前线程【分配任务区间】
while (advance) {
// 分配任务的开始下标,分配任务的结束下标
int nextIndex, nextBound;
// --i 让当前线程处理下一个索引,true说明当前的迁移任务尚未完成,false说明线程已经完成或者还未分配
if (--i >= bound || finishing)
advance = false;
// 迁移的开始下标,小于0说明没有区间需要迁移了,设置当前线程的 i 变量为 -1 跳出循环
else if ((nextIndex = transferIndex) <= 0) {
i = -1;
advance = false;
}
// 逻辑到这说明还有区间需要分配,然后给当前线程分配任务,
else if (U.compareAndSwapInt(this, TRANSFERINDEX, nextIndex,
// 判断区间是否还够一个步长,不够就全部分配
nextBound = (nextIndex > stride ? nextIndex - stride : 0))) {
// 当前线程的结束下标
bound = nextBound;
// 当前线程的开始下标,上一个线程结束的下标的下一个索引就是这个线程开始的下标
i = nextIndex - 1;
// 任务分配结束,跳出循环执行迁移操作
advance = false;
}
}
// 【分配完成,开始数据迁移操作】
// 【CASE1】:i < 0 成立表示当前线程未分配到任务,或者任务执行完了
if (i < 0 || i >= n || i + n >= nextn) {
int sc;
// 如果迁移完成
if (finishing) {
nextTable = null; // help GC
table = nextTab; // 新表赋值给当前对象
sizeCtl = (n << 1) - (n >>> 1);// 扩容阈值为 2n - n/2 = 3n/2 = 0.75*(2n)
return;
}
// 当前线程完成了分配的任务区间,可以退出,先把 sizeCtl 赋值给 sc 保留
if (U.compareAndSwapInt(this, SIZECTL, sc = sizeCtl, sc - 1)) {
// 判断当前线程是不是最后一个线程,不是的话直接 return,
if ((sc - 2) != resizeStamp(n) << RESIZE_STAMP_SHIFT)
return;
// 所以最后一个线程退出的时候,sizeCtl 的低 16 位为 1
finishing = advance = true;
// 【这里表示最后一个线程需要重新检查一遍是否有漏掉的区间】
i = n;
}
}
// 【CASE2】:当前桶位未存放数据,只需要将此处设置为 fwd 节点即可。
else if ((f = tabAt(tab, i)) == null)
advance = casTabAt(tab, i, null, fwd);
// 【CASE3】:说明当前桶位已经迁移过了,当前线程不用再处理了,直接处理下一个桶位即可
else if ((fh = f.hash) == MOVED)
advance = true;
// 【CASE4】:当前桶位有数据,而且 node 节点不是 fwd 节点,说明这些数据需要迁移
else {
// 【锁住头节点】
synchronized (f) {
// 二次检查,防止头节点已经被修改了,因为这里才是线程安全的访问
if (tabAt(tab, i) == f) {
// 【迁移数据的逻辑,和 HashMap 相似】
// ln 表示低位链表引用
// hn 表示高位链表引用
Node<K,V> ln, hn;
// 哈希 > 0 表示当前桶位是链表桶位
if (fh >= 0) {
// 和 HashMap 的处理方式一致,与老数组长度相与,16 是 10000
// 判断对应的 1 的位置上是 0 或 1 分成高低位链表
int runBit = fh & n;
Node<K,V> lastRun = f;
// 遍历链表,寻找【逆序看】最长的对应位相同的链表,看下面的图更好的理解
for (Node<K,V> p = f.next; p != null; p = p.next) {
// 将当前节点的哈希 与 n
int b = p.hash & n;
// 如果当前值与前面节点的值 对应位 不同,则修改 runBit,把 lastRun 指向当前节点
if (b != runBit) {
runBit = b;
lastRun = p;
}
}
// 判断筛选出的链表是低位的还是高位的
if (runBit == 0) {
ln = lastRun; // ln 指向该链表
hn = null; // hn 为 null
}
// 说明 lastRun 引用的链表为高位链表,就让 hn 指向高位链表头节点
else {
hn = lastRun;
ln = null;
}
// 从头开始遍历所有的链表节点,迭代到 p == lastRun 节点跳出循环
for (Node<K,V> p = f; p != lastRun; p = p.next) {
int ph = p.hash; K pk = p.key; V pv = p.val;
if ((ph & n) == 0)
// 【头插法】,从右往左看,首先 ln 指向的是上一个节点,
// 所以这次新建的节点的 next 指向上一个节点,然后更新 ln 的引用
ln = new Node<K,V>(ph, pk, pv, ln);
else
hn = new Node<K,V>(ph, pk, pv, hn);
}
// 高低位链设置到新表中的指定位置
setTabAt(nextTab, i, ln);
setTabAt(nextTab, i + n, hn);
// 老表中的该桶位设置为 fwd 节点
setTabAt(tab, i, fwd);
advance = true;
}
// 条件成立:表示当前桶位是 红黑树结点
else if (f instanceof TreeBin) {
TreeBin<K,V> t = (TreeBin<K,V>)f;
TreeNode<K,V> lo = null, loTail = null;
TreeNode<K,V> hi = null, hiTail = null;
int lc = 0, hc = 0;
// 迭代 TreeBin 中的双向链表,从头结点至尾节点
for (Node<K,V> e = t.first; e != null; e = e.next) {
// 迭代的当前元素的 hash
int h = e.hash;
TreeNode<K,V> p = new TreeNode<K,V>
(h, e.key, e.val, null, null);
// 条件成立表示当前循环节点属于低位链节点
if ((h & n) == 0) {
if ((p.prev = loTail) == null)
lo = p;
else
//【尾插法】
loTail.next = p;
// loTail 指向尾节点
loTail = p;
++lc;
}
else {
if ((p.prev = hiTail) == null)
hi = p;
else
hiTail.next = p;
hiTail = p;
++hc;
}
}
// 拆成的高位低位两个链,【判断是否需要需要转化为链表】,反之保持树化
ln = (lc <= UNTREEIFY_THRESHOLD) ? untreeify(lo) :
(hc != 0) ? new TreeBin<K,V>(lo) : t;
hn = (hc <= UNTREEIFY_THRESHOLD) ? untreeify(hi) :
(lc != 0) ? new TreeBin<K,V>(hi) : t;
setTabAt(nextTab, i, ln);
setTabAt(nextTab, i + n, hn);
setTabAt(tab, i, fwd);
advance = true;
}
}
}
}
}
}链表处理的 LastRun 机制,可以减少节点的创建
helpTransfer():帮助扩容机制
1
2
3
4
5
6
7
8
9
10
11
12
13
14
15
16
17
18
19
20
21
22
23final Node<K,V>[] helpTransfer(Node<K,V>[] tab, Node<K,V> f) {
Node<K,V>[] nextTab; int sc;
// 数组不为空,节点是转发节点,获取转发节点指向的新表开始协助主线程扩容
if (tab != null && (f instanceof ForwardingNode) &&
(nextTab = ((ForwardingNode<K,V>)f).nextTable) != null) {
// 扩容标识戳
int rs = resizeStamp(tab.length);
// 判断数据迁移是否完成,迁移完成会把 新表赋值给 nextTable 属性
while (nextTab == nextTable && table == tab && (sc = sizeCtl) < 0) {
if ((sc >>> RESIZE_STAMP_SHIFT) != rs || sc == rs + 1 ||
sc == rs + MAX_RESIZERS || transferIndex <= 0)
break;
// 设置扩容线程数量 + 1
if (U.compareAndSwapInt(this, SIZECTL, sc, sc + 1)) {
// 协助扩容
transfer(tab, nextTab);
break;
}
}
return nextTab;
}
return table;
}
获取方法
ConcurrentHashMap 使用 get() 方法获取指定 key 的数据
get():获取指定数据的方法
1
2
3
4
5
6
7
8
9
10
11
12
13
14
15
16
17
18
19
20
21
22
23
24
25
26public V get(Object key) {
Node<K,V>[] tab; Node<K,V> e, p; int n, eh; K ek;
// 扰动运算,获取 key 的哈希值
int h = spread(key.hashCode());
// 判断当前哈希表的数组是否初始化
if ((tab = table) != null && (n = tab.length) > 0 &&
// 如果 table 已经初始化,进行【哈希寻址】,映射到数组对应索引处,获取该索引处的头节点
(e = tabAt(tab, (n - 1) & h)) != null) {
// 对比头结点 hash 与查询 key 的 hash 是否一致
if ((eh = e.hash) == h) {
// 进行值的判断,如果成功就说明当前节点就是要查询的节点,直接返回
if ((ek = e.key) == key || (ek != null && key.equals(ek)))
return e.val;
}
// 当前槽位的【哈希值小于0】说明是红黑树节点或者是正在扩容的 fwd 节点
else if (eh < 0)
return (p = e.find(h, key)) != null ? p.val : null;
// 当前桶位是【链表】,循环遍历查找
while ((e = e.next) != null) {
if (e.hash == h &&
((ek = e.key) == key || (ek != null && key.equals(ek))))
return e.val;
}
}
return null;
}ForwardingNode#find:转移节点的查找方法
1
2
3
4
5
6
7
8
9
10
11
12
13
14
15
16
17
18
19
20
21
22
23
24
25
26
27
28
29
30
31
32
33
34
35
36
37Node<K,V> find(int h, Object k) {
// 获取新表的引用
outer: for (Node<K,V>[] tab = nextTable;;) {
// e 表示在扩容而创建新表使用寻址算法得到的桶位头结点,n 表示为扩容而创建的新表的长度
Node<K,V> e; int n;
if (k == null || tab == null || (n = tab.length) == 0 ||
// 在新表中重新定位 hash 对应的头结点,表示在 oldTable 中对应的桶位在迁移之前就是 null
(e = tabAt(tab, (n - 1) & h)) == null)
return null;
for (;;) {
int eh; K ek;
// 【哈希相同值也相同】,表示新表当前命中桶位中的数据,即为查询想要数据
if ((eh = e.hash) == h && ((ek = e.key) == k || (ek != null && k.equals(ek))))
return e;
// eh < 0 说明当前新表中该索引的头节点是 TreeBin 类型,或者是 FWD 类型
if (eh < 0) {
// 在并发很大的情况下新扩容的表还没完成可能【再次扩容】,在此方法处再次拿到 FWD 类型
if (e instanceof ForwardingNode) {
// 继续获取新的 fwd 指向的新数组的地址,递归了
tab = ((ForwardingNode<K,V>)e).nextTable;
continue outer;
}
else
// 说明此桶位为 TreeBin 节点,使用TreeBin.find 查找红黑树中相应节点。
return e.find(h, k);
}
// 逻辑到这说明当前桶位是链表,将当前元素指向链表的下一个元素,判断当前元素的下一个位置是否为空
if ((e = e.next) == null)
// 条件成立说明迭代到链表末尾,【未找到对应的数据,返回 null】
return null;
}
}
}
删除方法
remove():删除指定元素
1
2
3public V remove(Object key) {
return replaceNode(key, null, null);
}replaceNode():替代指定的元素,会协助扩容,增删改(写)都会协助扩容,查询(读)操作不会,因为读操作不涉及加锁
1
2
3
4
5
6
7
8
9
10
11
12
13
14
15
16
17
18
19
20
21
22
23
24
25
26
27
28
29
30
31
32
33
34
35
36
37
38
39
40
41
42
43
44
45
46
47
48
49
50
51
52
53
54
55
56
57
58
59
60
61
62
63
64
65
66
67
68
69
70
71
72
73
74
75
76
77
78
79
80
81
82
83
84
85
86
87
88
89
90final V replaceNode(Object key, V value, Object cv) {
// 计算 key 扰动运算后的 hash
int hash = spread(key.hashCode());
// 开始自旋
for (Node<K,V>[] tab = table;;) {
Node<K,V> f; int n, i, fh;
// 【CASE1】:table 还未初始化或者哈希寻址的数组索引处为 null,直接结束自旋,返回 null
if (tab == null || (n = tab.length) == 0 || (f = tabAt(tab, i = (n - 1) & hash)) == null)
break;
// 【CASE2】:条件成立说明当前 table 正在扩容,【当前是个写操作,所以当前线程需要协助 table 完成扩容】
else if ((fh = f.hash) == MOVED)
tab = helpTransfer(tab, f);
// 【CASE3】:当前桶位可能是 链表 也可能是 红黑树
else {
// 保留替换之前数据引用
V oldVal = null;
// 校验标记
boolean validated = false;
// 【加锁当前桶位头结点】,加锁成功之后会进入代码块
synchronized (f) {
// 双重检查
if (tabAt(tab, i) == f) {
// 说明当前节点是链表节点
if (fh >= 0) {
validated = true;
//遍历所有的节点
for (Node<K,V> e = f, pred = null;;) {
K ek;
// hash 和值都相同,定位到了具体的节点
if (e.hash == hash &&
((ek = e.key) == key ||
(ek != null && key.equals(ek)))) {
// 当前节点的value
V ev = e.val;
if (cv == null || cv == ev ||
(ev != null && cv.equals(ev))) {
// 将当前节点的值 赋值给 oldVal 后续返回会用到
oldVal = ev;
if (value != null) // 条件成立说明是替换操作
e.val = value;
else if (pred != null) // 非头节点删除操作,断开链表
pred.next = e.next;
else
// 说明当前节点即为头结点,将桶位头节点设置为以前头节点的下一个节点
setTabAt(tab, i, e.next);
}
break;
}
pred = e;
if ((e = e.next) == null)
break;
}
}
// 说明是红黑树节点
else if (f instanceof TreeBin) {
validated = true;
TreeBin<K,V> t = (TreeBin<K,V>)f;
TreeNode<K,V> r, p;
if ((r = t.root) != null &&
(p = r.findTreeNode(hash, key, null)) != null) {
V pv = p.val;
if (cv == null || cv == pv ||
(pv != null && cv.equals(pv))) {
oldVal = pv;
// 条件成立说明替换操作
if (value != null)
p.val = value;
// 删除操作
else if (t.removeTreeNode(p))
setTabAt(tab, i, untreeify(t.first));
}
}
}
}
}
// 其他线程修改过桶位头结点时,当前线程 sync 头结点锁错对象,validated 为 false,会进入下次 for 自旋
if (validated) {
if (oldVal != null) {
// 替换的值为 null,【说明当前是一次删除操作,更新当前元素个数计数器】
if (value == null)
addCount(-1L, -1);
return oldVal;
}
break;
}
}
}
return null;
}
参考视频:https://space.bilibili.com/457326371/
JDK7原理
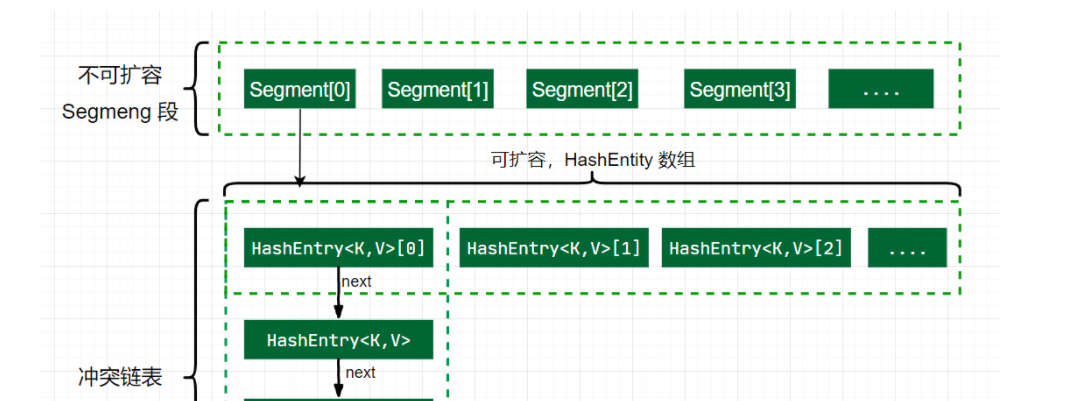
ConcurrentHashMap 对锁粒度进行了优化,分段锁技术,将整张表分成了多个数组(Segment),每个数组又是一个类似 HashMap 数组的结构。允许多个修改操作并发进行,Segment 是一种可重入锁,继承 ReentrantLock,并发时锁住的是每个 Segment,其他 Segment 还是可以操作的,这样不同 Segment 之间就可以实现并发,大大提高效率。
底层结构: Segment 数组 + HashEntry 数组 + 链表(数组 + 链表是 HashMap 的结构)
优点:如果多个线程访问不同的 segment,实际是没有冲突的,这与 JDK8 中是类似的
缺点:Segments 数组默认大小为16,这个容量初始化指定后就不能改变了,并且不是懒惰初始化
CopyOnWrite
原理分析
CopyOnWriteArrayList 采用了写入时拷贝的思想,增删改操作会将底层数组拷贝一份,在新数组上执行操作,不影响其它线程的并发读,读写分离
CopyOnWriteArraySet 底层对 CopyOnWriteArrayList 进行了包装,装饰器模式
1 | public CopyOnWriteArraySet() { |
存储结构:
1
private transient volatile Object[] array; // volatile 保证了读写线程之间的可见性
全局锁:保证线程的执行安全
1
final transient ReentrantLock lock = new ReentrantLock();
新增数据:需要加锁,创建新的数组操作
1
2
3
4
5
6
7
8
9
10
11
12
13
14
15
16
17
18
19public boolean add(E e) {
final ReentrantLock lock = this.lock;
// 加锁,保证线程安全
lock.lock();
try {
// 获取旧的数组
Object[] elements = getArray();
int len = elements.length;
// 【拷贝新的数组(这里是比较耗时的操作,但不影响其它读线程)】
Object[] newElements = Arrays.copyOf(elements, len + 1);
// 添加新元素
newElements[len] = e;
// 替换旧的数组,【这个操作以后,其他线程获取数组就是获取的新数组了】
setArray(newElements);
return true;
} finally {
lock.unlock();
}
}读操作:不加锁,在原数组上操作
1
2
3
4
5
6public E get(int index) {
return get(getArray(), index);
}
private E get(Object[] a, int index) {
return (E) a[index];
}适合读多写少的应用场景
迭代器:CopyOnWriteArrayList 在返回迭代器时,创建一个内部数组当前的快照(引用),即使其他线程替换了原始数组,迭代器遍历的快照依然引用的是创建快照时的数组,所以这种实现方式也存在一定的数据延迟性,对其他线程并行添加的数据不可见
1
2
3
4
5
6
7
8
9
10
11
12
13
14
15
16
17
18
19
20public Iterator<E> iterator() {
// 获取到数组引用,整个遍历的过程该数组都不会变,一直引用的都是老数组,
return new COWIterator<E>(getArray(), 0);
}
// 迭代器会创建一个底层array的快照,故主类的修改不影响该快照
static final class COWIterator<E> implements ListIterator<E> {
// 内部数组快照
private final Object[] snapshot;
private COWIterator(Object[] elements, int initialCursor) {
cursor = initialCursor;
// 数组的引用在迭代过程不会改变
snapshot = elements;
}
// 【不支持写操作】,因为是在快照上操作,无法同步回去
public void remove() {
throw new UnsupportedOperationException();
}
}
弱一致性
数据一致性就是读到最新更新的数据:
强一致性:当更新操作完成之后,任何多个后续进程或者线程的访问都会返回最新的更新过的值
弱一致性:系统并不保证进程或者线程的访问都会返回最新的更新过的值,也不会承诺多久之后可以读到
| 时间点 | 操作 |
|---|---|
| 1 | Thread-0 getArray() |
| 2 | Thread-1 getArray() |
| 3 | Thread-1 setArray(arrayCopy) |
| 4 | Thread-0 array[index] |
Thread-0 读到了脏数据
不一定弱一致性就不好
- 数据库的事务隔离级别就是弱一致性的表现
- 并发高和一致性是矛盾的,需要权衡
安全失败
在 java.util 包的集合类就都是快速失败的,而 java.util.concurrent 包下的类都是安全失败
快速失败:在 A 线程使用迭代器对集合进行遍历的过程中,此时 B 线程对集合进行修改(增删改),或者 A 线程在遍历过程中对集合进行修改,都会导致 A 线程抛出 ConcurrentModificationException 异常
- AbstractList 类中的成员变量 modCount,用来记录 List 结构发生变化的次数,结构发生变化是指添加或者删除至少一个元素的操作,或者是调整内部数组的大小,仅仅设置元素的值不算结构发生变化
- 在进行序列化或者迭代等操作时,需要比较操作前后 modCount 是否改变,如果改变了抛出 CME 异常
安全失败:采用安全失败机制的集合容器,在迭代器遍历时直接在原集合数组内容上访问,但其他线程的增删改都会新建数组进行修改,就算修改了集合底层的数组容器,迭代器依然引用着以前的数组(快照思想),所以不会出现异常
ConcurrentHashMap 不会出现并发时的迭代异常,因为在迭代过程中 CHM 的迭代器并没有判断结构的变化,迭代器还可以根据迭代的节点状态去寻找并发扩容时的新表进行迭代
1
2
3ConcurrentHashMap map = new ConcurrentHashMap();
// KeyIterator
Iterator iterator = map.keySet().iterator();1
2
3
4
5
6
7
8Traverser(Node<K,V>[] tab, int size, int index, int limit) {
// 引用还是原来集合的 Node 数组,所以其他线程对数据的修改是可见的
this.tab = tab;
this.baseSize = size;
this.baseIndex = this.index = index;
this.baseLimit = limit;
this.next = null;
}1
2
3
4
5
6
7
8
9
10
11public final boolean hasNext() { return next != null; }
public final K next() {
Node<K,V> p;
if ((p = next) == null)
throw new NoSuchElementException();
K k = p.key;
lastReturned = p;
// 在方法中进行下一个节点的获取,会进行槽位头节点的状态判断
advance();
return k;
}
Collections
Collections类是用来操作集合的工具类,提供了集合转换成线程安全的方法:
1 | public static <T> Collection<T> synchronizedCollection(Collection<T> c) { |
源码:底层也是对方法进行加锁
1 | public boolean add(E e) { |
SkipListMap
底层结构
跳表 SkipList 是一个有序的链表,默认升序,底层是链表加多级索引的结构。跳表可以对元素进行快速查询,类似于平衡树,是一种利用空间换时间的算法
对于单链表,即使链表是有序的,如果查找数据也只能从头到尾遍历链表,所以采用链表上建索引的方式提高效率,跳表的查询时间复杂度是 **O(logn)**,空间复杂度 O(n)
ConcurrentSkipListMap 提供了一种线程安全的并发访问的排序映射表,内部是跳表结构实现,通过 CAS + volatile 保证线程安全
平衡树和跳表的区别:
- 对平衡树的插入和删除往往很可能导致平衡树进行一次全局的调整;而对跳表的插入和删除,只需要对整个结构的局部进行操作
- 在高并发的情况下,保证整个平衡树的线程安全需要一个全局锁;对于跳表则只需要部分锁,拥有更好的性能
BaseHeader 存储数据,headIndex 存储索引,纵向上所有索引都指向链表最下面的节点
成员变量
标识索引头节点位置
1
private static final Object BASE_HEADER = new Object();
跳表的顶层索引
1
private transient volatile HeadIndex<K,V> head;
比较器,为 null 则使用自然排序
1
final Comparator<? super K> comparator;
Node 节点
1
2
3
4
5static final class Node<K, V>{
final K key; // key 是 final 的, 说明节点一旦定下来, 除了删除, 一般不会改动 key
volatile Object value; // 对应的 value
volatile Node<K, V> next; // 下一个节点,单向链表
}索引节点 Index,只有向下和向右的指针
1
2
3
4
5
6
7
8
9
10
11
12
13
14
15
16
17
18static class Index<K, V>{
final Node<K, V> node; // 索引指向的节点,每个都会指向数据节点
final Index<K, V> down; // 下边level层的Index,分层索引
volatile Index<K, V> right; // 右边的Index,单向
// 在 index 本身和 succ 之间插入一个新的节点 newSucc
final boolean link(Index<K, V> succ, Index<K, V> newSucc){
Node<K, V> n = node;
newSucc.right = succ;
// 把当前节点的右指针从 succ 改为 newSucc
return n.value != null && casRight(succ, newSucc);
}
// 断开当前节点和 succ 节点,将当前的节点 index 设置其的 right 为 succ.right,就是把 succ 删除
final boolean unlink(Index<K, V> succ){
return node.value != null && casRight(succ, succ.right);
}
}头索引节点 HeadIndex
1
2
3
4
5
6
7static final class HeadIndex<K,V> extends Index<K,V> {
final int level; // 表示索引层级,所有的 HeadIndex 都指向同一个 Base_header 节点
HeadIndex(Node<K,V> node, Index<K,V> down, Index<K,V> right, int level) {
super(node, down, right);
this.level = level;
}
}
成员方法
其他方法
构造方法:
1
2
3
4public ConcurrentSkipListMap() {
this.comparator = null; // comparator 为 null,使用 key 的自然序,如字典序
initialize();
}1
2
3
4
5
6
7
8
9private void initialize() {
keySet = null;
entrySet = null;
values = null;
descendingMap = null;
// 初始化索引头节点,Node 的 key 为 null,value 为 BASE_HEADER 对象,下一个节点为 null
// head 的分层索引 down 为 null,链表的后续索引 right 为 null,层级 level 为第 1 层
head = new HeadIndex<K,V>(new Node<K,V>(null, BASE_HEADER, null), null, null, 1);
}cpr:排序
1
2
3
4// x 是比较者,y 是被比较者,比较者大于被比较者 返回正数,小于返回负数,相等返回 0
static final int cpr(Comparator c, Object x, Object y) {
return (c != null) ? c.compare(x, y) : ((Comparable)x).compareTo(y);
}
添加方法
findPredecessor():寻找前置节点
从最上层的头索引开始向右查找(链表的后续索引),如果后续索引的节点的 key 大于要查找的 key,则头索引移到下层链表,在下层链表查找,以此反复,一直查找到没有下层的分层索引为止,返回该索引的节点。如果后续索引的节点的 key 小于要查找的 key,则在该层链表中向后查找。由于查找的 key 可能永远大于索引节点的 key,所以只能找到目标的前置索引节点。如果遇到空值索引的存在,通过 CAS 来断开索引
1
2
3
4
5
6
7
8
9
10
11
12
13
14
15
16
17
18
19
20
21
22
23
24
25
26
27
28
29
30
31
32
33
34
35
36
37
38
39private Node<K,V> findPredecessor(Object key, Comparator<? super K> cmp) {
if (key == null)
throw new NullPointerException(); // don't postpone errors
for (;;) {
// 1.初始数据 q 是 head,r 是最顶层 h 的右 Index 节点
for (Index<K,V> q = head, r = q.right, d;;) {
// 2.右索引节点不为空,则进行向下查找
if (r != null) {
Node<K,V> n = r.node;
K k = n.key;
// 3.n.value 为 null 说明节点 n 正在删除的过程中,此时【当前线程帮其删除索引】
if (n.value == null) {
// 在 index 层直接删除 r 索引节点
if (!q.unlink(r))
// 删除失败重新从 head 节点开始查找,break 一个 for 到步骤 1,又从初始值开始
break;
// 删除节点 r 成功,获取新的 r 节点,
r = q.right;
// 回到步骤 2,还是从这层索引开始向右遍历
continue;
}
// 4.若参数 key > r.node.key,则继续向右遍历, continue 到步骤 2 处获取右节点
// 若参数 key < r.node.key,说明需要进入下层索引,到步骤 5
if (cpr(cmp, key, k) > 0) {
q = r;
r = r.right;
continue;
}
}
// 5.先让 d 指向 q 的下一层,判断是否是 null,是则说明已经到了数据层,也就是第一层
if ((d = q.down) == null)
return q.node;
// 6.未到数据层, 进行重新赋值向下扫描
q = d; // q 指向 d
r = d.right;// r 指向 q 的后续索引节点,此时(q.key < key < r.key)
}
}
}put():添加数据
1
2
3
4
5
6public V put(K key, V value) {
// 非空判断,value不能为空
if (value == null)
throw new NullPointerException();
return doPut(key, value, false);
}1
2
3
4
5
6
7
8
9
10
11
12
13
14
15
16
17
18
19
20
21
22
23
24
25
26
27
28
29
30
31
32
33
34
35
36
37
38
39
40
41
42
43
44
45
46
47
48
49
50
51
52
53
54
55
56
57
58
59
60
61
62
63
64
65
66
67
68
69
70
71
72
73
74
75
76
77
78
79
80
81
82
83
84
85
86
87
88
89
90
91
92
93
94
95
96
97
98
99
100
101
102
103
104
105
106
107
108
109
110
111
112
113
114
115
116
117
118
119
120
121
122
123
124
125
126
127
128
129
130
131
132
133
134
135
136
137
138
139
140
141
142
143
144
145
146
147
148
149
150
151
152
153
154
155
156
157
158
159
160
161
162
163
164
165
166
167
168
169
170
171
172
173
174
175
176
177
178
179
180
181
182
183
184
185
186
187
188
189
190
191
192
193
194
195
196
197
198
199
200
201
202
203
204
205private V doPut(K key, V value, boolean onlyIfAbsent) {
Node<K,V> z;
// 非空判断,key 不能为空
if (key == null)
throw new NullPointerException();
Comparator<? super K> cmp = comparator;
// outer 循环,【把待插入数据插入到数据层的合适的位置,并在扫描过程中处理已删除(value = null)的数据】
outer: for (;;) {
//0.for (;;)
//1.将 key 对应的前继节点找到, b 为前继节点,是数据层的, n 是前继节点的 next,
// 若没发生条件竞争,最终 key 在 b 与 n 之间 (找到的 b 在 base_level 上)
for (Node<K,V> b = findPredecessor(key, cmp), n = b.next;;) {
// 2.n 不为 null 说明 b 不是链表的最后一个节点
if (n != null) {
Object v; int c;
// 3.获取 n 的右节点
Node<K,V> f = n.next;
// 4.条件竞争,并发下其他线程在 b 之后插入节点或直接删除节点 n, break 到步骤 0
if (n != b.next)
break;
// 若节点 n 已经删除, 则调用 helpDelete 进行【帮助删除节点】
if ((v = n.value) == null) {
n.helpDelete(b, f);
break;
}
// 5.节点 b 被删除中,则 break 到步骤 0,
// 【调用findPredecessor帮助删除index层的数据, node层的数据会通过helpDelete方法进行删除】
if (b.value == null || v == n)
break;
// 6.若 key > n.key,则进行向后扫描
// 若 key < n.key,则证明 key 应该存储在 b 和 n 之间
if ((c = cpr(cmp, key, n.key)) > 0) {
b = n;
n = f;
continue;
}
// 7.key 的值和 n.key 相等,则可以直接覆盖赋值
if (c == 0) {
// onlyIfAbsent 默认 false,
if (onlyIfAbsent || n.casValue(v, value)) {
V vv = (V)v;
// 返回被覆盖的值
return vv;
}
// cas失败,break 一层循环,返回 0 重试
break;
}
// else c < 0; fall through
}
// 8.此时的情况 b.key < key < n.key,对应流程图1中的7,创建z节点指向n
z = new Node<K,V>(key, value, n);
// 9.尝试把 b.next 从 n 设置成 z
if (!b.casNext(n, z))
// cas失败,返回到步骤0,重试
break;
// 10.break outer 后, 上面的 for 循环不会再执行, 而后执行下面的代码
break outer;
}
}
// 【以上插入节点已经完成,剩下的任务要根据随机数的值来表示是否向上增加层数与上层索引】
// 随机数
int rnd = ThreadLocalRandom.nextSecondarySeed();
// 如果随机数的二进制与 10000000000000000000000000000001 进行与运算为 0
// 即随机数的二进制最高位与最末尾必须为 0,其他位无所谓,就进入该循环
// 如果随机数的二进制最高位与最末位不为 0,不增加新节点的层数
// 11.判断是否需要添加 level,32 位
if ((rnd & 0x80000001) == 0) {
// 索引层 level,从 1 开始,就是最底层
int level = 1, max;
// 12.判断最低位前面有几个 1,有几个leve就加几:0..0 0001 1110,这是4个,则1+4=5
// 【最大有30个就是 1 + 30 = 31
while (((rnd >>>= 1) & 1) != 0)
++level;
// 最终会指向 z 节点,就是添加的节点
Index<K,V> idx = null;
// 指向头索引节点
HeadIndex<K,V> h = head;
// 13.判断level是否比当前最高索引小,图中 max 为 3
if (level <= (max = h.level)) {
for (int i = 1; i <= level; ++i)
// 根据层数level不断创建新增节点的上层索引,索引的后继索引留空
// 第一次idx为null,也就是下层索引为空,第二次把上次的索引作为下层索引,【类似头插法】
idx = new Index<K,V>(z, idx, null);
// 循环以后的索引结构
// index-3 ← idx
// ↓
// index-2
// ↓
// index-1
// ↓
// z-node
}
// 14.若 level > max,则【只增加一层 index 索引层】,3 + 1 = 4
else {
level = max + 1;
//创建一个 index 数组,长度是 level+1,假设 level 是 4,创建的数组长度为 5
Index<K,V>[] idxs = (Index<K,V>[])new Index<?,?>[level+1];
// index[0]的数组 slot 并没有使用,只使用 [1,level] 这些数组的 slot
for (int i = 1; i <= level; ++i)
idxs[i] = idx = new Index<K,V>(z, idx, null);
// index-4 ← idx
// ↓
// ......
// ↓
// index-1
// ↓
// z-node
for (;;) {
h = head;
// 获取头索引的层数,3
int oldLevel = h.level;
// 如果 level <= oldLevel,说明其他线程进行了 index 层增加操作,退出循环
if (level <= oldLevel)
break;
// 定义一个新的头索引节点
HeadIndex<K,V> newh = h;
// 获取头索引的节点,就是 BASE_HEADER
Node<K,V> oldbase = h.node;
// 升级 baseHeader 索引,升高一级,并发下可能升高多级
for (int j = oldLevel + 1; j <= level; ++j)
// 参数1:底层node,参数二:down,为以前的头节点,参数三:right,新建
newh = new HeadIndex<K,V>(oldbase, newh, idxs[j], j);
// 执行完for循环之后,baseHeader 索引长这个样子,这里只升高一级
// index-4 → index-4 ← idx
// ↓ ↓
// index-3 index-3
// ↓ ↓
// index-2 index-2
// ↓ ↓
// index-1 index-1
// ↓ ↓
// baseHeader → .... → z-node
// cas 成功后,head 字段指向最新的 headIndex,baseHeader 的 index-4
if (casHead(h, newh)) {
// h 指向最新的 index-4 节点
h = newh;
// 让 idx 指向 z-node 的 index-3 节点,
// 因为从 index-3 - index-1 的这些 z-node 索引节点 都没有插入到索引链表
idx = idxs[level = oldLevel];
break;
}
}
}
// 15.【把新加的索引插入索引链表中】,有上述两种情况,一种索引高度不变,另一种是高度加 1
// 要插入的是第几层的索引
splice: for (int insertionLevel = level;;) {
// 获取头索引的层数,情况 1 是 3,情况 2 是 4
int j = h.level;
// 【遍历 insertionLevel 层的索引,找到合适的插入位置】
for (Index<K,V> q = h, r = q.right, t = idx;;) {
// 如果头索引为 null 或者新增节点索引为 null,退出插入索引的总循环
if (q == null || t == null)
// 此处表示有其他线程删除了头索引或者新增节点的索引
break splice;
// 头索引的链表后续索引存在,如果是新层则为新节点索引,如果是老层则为原索引
if (r != null) {
// 获取r的节点
Node<K,V> n = r.node;
// 插入的key和n.key的比较值
int c = cpr(cmp, key, n.key);
// 【删除空值索引】
if (n.value == null) {
if (!q.unlink(r))
break;
r = q.right;
continue;
}
// key > r.node.key,向右扫描
if (c > 0) {
q = r;
r = r.right;
continue;
}
}
// 执行到这里,说明 key < r.node.key,判断是否是第 j 层插入新增节点的前置索引
if (j == insertionLevel) {
// 【将新索引节点 t 插入 q r 之间】
if (!q.link(r, t))
break;
// 如果新增节点的值为 null,表示该节点已经被其他线程删除
if (t.node.value == null) {
// 找到该节点
findNode(key);
break splice;
}
// 插入层逐层自减,当为最底层时退出循环
if (--insertionLevel == 0)
break splice;
}
// 其他节点随着插入节点的层数下移而下移
if (--j >= insertionLevel && j < level)
t = t.down;
q = q.down;
r = q.right;
}
}
}
return null;
}findNode()
1
2
3
4
5private Node<K,V> findNode(Object key) {
// 原理与doGet相同,无非是 findNode 返回节点,doGet 返回 value
if ((c = cpr(cmp, key, n.key)) == 0)
return n;
}
获取方法
get(key):获取对应的数据
1
2
3public V get(Object key) {
return doGet(key);
}doGet():扫描过程会对已 value = null 的元素进行删除处理
1
2
3
4
5
6
7
8
9
10
11
12
13
14
15
16
17
18
19
20
21
22
23
24
25
26
27
28
29
30
31
32
33
34
35
36
37
38private V doGet(Object key) {
if (key == null)
throw new NullPointerException();
Comparator<? super K> cmp = comparator;
outer: for (;;) {
// 1.找到最底层节点的前置节点
for (Node<K,V> b = findPredecessor(key, cmp), n = b.next;;) {
Object v; int c;
// 2.【如果该前置节点的链表后续节点为 null,说明不存在该节点】
if (n == null)
break outer;
// b → n → f
Node<K,V> f = n.next;
// 3.如果n不为前置节点的后续节点,表示已经有其他线程删除了该节点
if (n != b.next)
break;
// 4.如果后续节点的值为null,【需要帮助删除该节点】
if ((v = n.value) == null) {
n.helpDelete(b, f);
break;
}
// 5.如果前置节点已被其他线程删除,重新循环
if (b.value == null || v == n)
break;
// 6.如果要获取的key与后续节点的key相等,返回节点的value
if ((c = cpr(cmp, key, n.key)) == 0) {
V vv = (V)v;
return vv;
}
// 7.key < n.key,因位 key > b.key,b 和 n 相连,说明不存在该节点或者被其他线程删除了
if (c < 0)
break outer;
b = n;
n = f;
}
}
return null;
}
删除方法
remove()
1
2
3
4
5
6
7
8
9
10
11
12
13
14
15
16
17
18
19
20
21
22
23
24
25
26
27
28
29
30
31
32
33
34
35
36
37
38
39
40
41
42
43
44
45
46
47
48
49
50
51
52
53
54
55
56public V remove(Object key) {
return doRemove(key, null);
}
final V doRemove(Object key, Object value) {
if (key == null)
throw new NullPointerException();
Comparator<? super K> cmp = comparator;
outer: for (;;) {
// 1.找到最底层目标节点的前置节点,b.key < key
for (Node<K,V> b = findPredecessor(key, cmp), n = b.next;;) {
Object v; int c;
// 2.如果该前置节点的链表后续节点为 null,退出循环,说明不存在这个元素
if (n == null)
break outer;
// b → n → f
Node<K,V> f = n.next;
if (n != b.next) // inconsistent read
break;
if ((v = n.value) == null) { // n is deleted
n.helpDelete(b, f);
break;
}
if (b.value == null || v == n) // b is deleted
break;
//3.key < n.key,说明被其他线程删除了,或者不存在该节点
if ((c = cpr(cmp, key, n.key)) < 0)
break outer;
//4.key > n.key,继续向后扫描
if (c > 0) {
b = n;
n = f;
continue;
}
//5.到这里是 key = n.key,value 不为空的情况下判断 value 和 n.value 是否相等
if (value != null && !value.equals(v))
break outer;
//6.【把 n 节点的 value 置空】
if (!n.casValue(v, null))
break;
//7.【给 n 添加一个删除标志 mark】,mark.next = f,然后把 b.next 设置为 f,成功后n出队
if (!n.appendMarker(f) || !b.casNext(n, f))
// 对 key 对应的 index 进行删除,调用了 findPredecessor 方法
findNode(key);
else {
// 进行操作失败后通过 findPredecessor 中进行 index 的删除
findPredecessor(key, cmp);
if (head.right == null)
// 进行headIndex 对应的index 层的删除
tryReduceLevel();
}
V vv = (V)v;
return vv;
}
}
return null;
}经过 findPredecessor() 中的 unlink() 后索引已经被删除
appendMarker():添加删除标记节点
1
2
3
4boolean appendMarker(Node<K,V> f) {
// 通过 CAS 让 n.next 指向一个 key 为 null,value 为 this,next 为 f 的标记节点
return casNext(f, new Node<K,V>(f));
}helpDelete():将添加了删除标记的节点清除,参数是该节点的前驱和后继节点
1
2
3
4
5
6
7
8
9
10
11void helpDelete(Node<K,V> b, Node<K,V> f) {
// this 节点的后续节点为 f,且本身为 b 的后续节点,一般都是正确的,除非被别的线程删除
if (f == next && this == b.next) {
// 如果 n 还还没有被标记
if (f == null || f.value != f)
casNext(f, new Node<K,V>(f));
else
// 通过 CAS,将 b 的下一个节点 n 变成 f.next,即成为图中的样式
b.casNext(this, f.next);
}
}tryReduceLevel():删除索引
1
2
3
4
5
6
7
8
9
10
11
12
13
14
15
16
17private void tryReduceLevel() {
HeadIndex<K,V> h = head;
HeadIndex<K,V> d;
HeadIndex<K,V> e;
if (h.level > 3 &&
(d = (HeadIndex<K,V>)h.down) != null &&
(e = (HeadIndex<K,V>)d.down) != null &&
e.right == null &&
d.right == null &&
h.right == null &&
// 设置头索引
casHead(h, d) &&
// 重新检查
h.right != null)
// 重新检查返回true,说明其他线程增加了索引层级,把索引头节点设置回来
casHead(d, h);
}
参考文章:https://my.oschina.net/u/3768341/blog/3135659
参考视频:https://www.bilibili.com/video/BV1Er4y1P7k1
NoBlocking
非阻塞队列
并发编程中,需要用到安全的队列,实现安全队列可以使用 2 种方式:
- 加锁,这种实现方式是阻塞队列
- 使用循环 CAS 算法实现,这种方式是非阻塞队列
ConcurrentLinkedQueue 是一个基于链接节点的无界线程安全队列,采用先进先出的规则对节点进行排序,当添加一个元素时,会添加到队列的尾部,当获取一个元素时,会返回队列头部的元素
补充:ConcurrentLinkedDeque 是双向链表结构的无界并发队列
ConcurrentLinkedQueue 使用约定:
- 不允许 null 入列
- 队列中所有未删除的节点的 item 都不能为 null 且都能从 head 节点遍历到
- 删除节点是将 item 设置为 null,队列迭代时跳过 item 为 null 节点
- head 节点跟 tail 不一定指向头节点或尾节点,可能存在滞后性
ConcurrentLinkedQueue 由 head 节点和 tail 节点组成,每个节点由节点元素和指向下一个节点的引用组成,组成一张链表结构的队列
1 | private transient volatile Node<E> head; |
构造方法
无参构造方法:
1
2
3
4public ConcurrentLinkedQueue() {
// 默认情况下 head 节点存储的元素为空,dummy 节点,tail 节点等于 head 节点
head = tail = new Node<E>(null);
}有参构造方法
1
2
3
4
5
6
7
8
9
10
11
12
13
14
15
16
17
18
19public ConcurrentLinkedQueue(Collection<? extends E> c) {
Node<E> h = null, t = null;
// 遍历节点
for (E e : c) {
checkNotNull(e);
Node<E> newNode = new Node<E>(e);
if (h == null)
h = t = newNode;
else {
// 单向链表
t.lazySetNext(newNode);
t = newNode;
}
}
if (h == null)
h = t = new Node<E>(null);
head = h;
tail = t;
}
入队方法
与传统的链表不同,单线程入队的工作流程:
- 将入队节点设置成当前队列尾节点的下一个节点
- 更新 tail 节点,如果 tail 节点的 next 节点不为空,则将入队节点设置成 tail 节点;如果 tail 节点的 next 节点为空,则将入队节点设置成 tail 的 next 节点,所以 tail 节点不总是尾节点,存在滞后性
1 | public boolean offer(E e) { |
图解入队:
当 tail 节点和尾节点的距离大于等于 1 时(每入队两次)更新 tail,可以减少 CAS 更新 tail 节点的次数,提高入队效率
线程安全问题:
- 线程 1 线程 2 同时入队,无论从哪个位置开始并发入队,都可以循环 CAS,直到入队成功,线程安全
- 线程 1 遍历,线程 2 入队,所以造成 ConcurrentLinkedQueue 的 size 是变化,需要加锁保证安全
- 线程 1 线程 2 同时出列,线程也是安全的
出队方法
出队列的就是从队列里返回一个节点元素,并清空该节点对元素的引用,并不是每次出队都更新 head 节点
- 当 head 节点里有元素时,直接弹出 head 节点里的元素,而不会更新 head 节点
- 当 head 节点里没有元素时,出队操作才会更新 head 节点
批处理方式可以减少使用 CAS 更新 head 节点的消耗,从而提高出队效率
1 | public E poll() { |
在更新完 head 之后,会将旧的头结点 h 的 next 域指向为 h,图中所示的虚线也就表示这个节点的自引用,被移动的节点(item 为 null 的节点)会被 GC 回收
如果这时,有一个线程来添加元素,通过 tail 获取的 next 节点则仍然是它本身,这就出现了p == q 的情况,出现该种情况之后,则会触发执行 head 的更新,将 p 节点重新指向为 head
参考文章:https://www.jianshu.com/p/231caf90f30b
成员方法
peek():会改变 head 指向,执行 peek() 方法后 head 会指向第一个具有非空元素的节点
1
2
3
4
5
6
7
8
9
10
11
12
13
14
15
16
17
18// 获取链表的首部元素,只读取而不移除
public E peek() {
restartFromHead:
for (;;) {
for (Node<E> h = head, p = h, q;;) {
E item = p.item;
if (item != null || (q = p.next) == null) {
// 更改h的位置为非空元素节点
updateHead(h, p);
return item;
}
else if (p == q)
continue restartFromHead;
else
p = q;
}
}
}size():用来获取当前队列的元素个数,因为整个过程都没有加锁,在并发环境中从调用 size 方法到返回结果期间有可能增删元素,导致统计的元素个数不精确
1
2
3
4
5
6
7
8
9
10
11
12public int size() {
int count = 0;
// first() 获取第一个具有非空元素的节点,若不存在,返回 null
// succ(p) 方法获取 p 的后继节点,若 p == p.next,则返回 head
// 类似遍历链表
for (Node<E> p = first(); p != null; p = succ(p))
if (p.item != null)
// 最大返回Integer.MAX_VALUE
if (++count == Integer.MAX_VALUE)
break;
return count;
}remove():移除元素
1
2
3
4
5
6
7
8
9
10
11
12
13
14
15
16
17
18
19
20
21
22
23
24
25
26
27
28public boolean remove(Object o) {
// 删除的元素不能为null
if (o != null) {
Node<E> next, pred = null;
for (Node<E> p = first(); p != null; pred = p, p = next) {
boolean removed = false;
E item = p.item;
// 节点元素不为null
if (item != null) {
// 若不匹配,则获取next节点继续匹配
if (!o.equals(item)) {
next = succ(p);
continue;
}
// 若匹配,则通过 CAS 操作将对应节点元素置为 null
removed = p.casItem(item, null);
}
// 获取删除节点的后继节点
next = succ(p);
// 将被删除的节点移除队列
if (pred != null && next != null) // unlink
pred.casNext(p, next);
if (removed)
return true;
}
}
return false;
}
 微信
微信 支付宝
支付宝